By Wendy the Other Half
We were expecting the roof to be long finished by now but events have conspired against us ( Local Authotity Scaffolding Licence and the weather). We are at last making steady progress. We’ve employed local builders who were recommended by a neighbour. They’re both experienced in traditional building techniques and were refreshingly enthusiastic about using lime etc. Not from them “Ee missus, you need strong cement and UPVC cladding t’ dormers” through sucked teeth.
Well, they’ve been cracking on. As you’ll have seen we’ve got straight chimney pots + flue liners, the back part of the roof is on and the two rear dormers are fixed. Unfortunately the two brown PVC windows are still there but the Stuff Doer hasn’t had time to make the wooden Yorkshire sliding sashes for some reason. We’re thinking of painting these in the meantime so they don’t stick out like sore thumbs. In fairness it’s not just a case of replacing them as we’re in a conservation area and that will require planning. Perversely the windows we’ve been lumbered with are unlikely to have been permissible when they were installed!
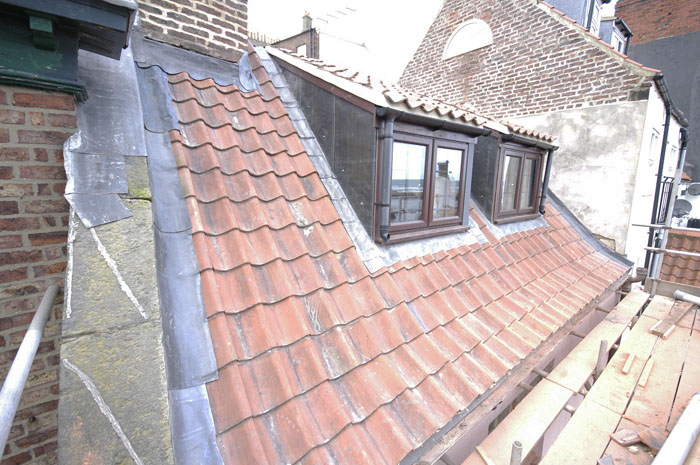
Pantile roof re-laid with tiles salvaged fron both the front and back

Roof dorma ready to be tiled around
So, just the front part of the roof to go. This may even be finished this week but, like so much outside work, it’s dependent on the weather. Oh well, I suppose they can be getting on with chipping off the render.
February 26th, 2013 | Posted in I do DIY stuff, I do PROPERTY stuff, Stuff from the Other Half (Wife), Whitby Cottage | No Comments
By Wendy the Other Half
While the scaffolding has been up the Stuff Doer has taken advantage and started replacing the cement pointing (ribbon pointing) on the front stonework. The pointing, although not in good shape and wasn’t on our priority list but cement mortar does the stone no good. Also working at height on a ladder on a very narrow street with no pavement is perhaps not considered best practice as far as the dreaded ‘elf and safety is concerned!
Many hours have been spent raking out the cement pointing and replaced with lime mortar (NHL3.5). It’s far from finished but the difficult scary high stuff is done. I’m sure the Stuff Doer will explain why cement is bad and lime better and fill in all the practical details when he’s time (ie not up a skinny scaffold with bucket and trowel)
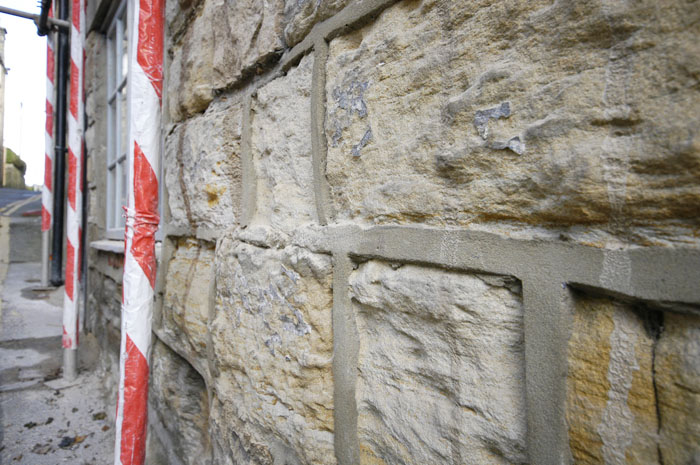
Before - Ribbon pointing on soft sandstone blocks, causing accelerated deterioration

After : re-pointed sandstone wall useing lime based mortar
With the front re-pointed, the back re-rendered, windows repaired and a new roof plus guttering we should be water tight and drying out.

damage to stone by ribbon pointing
If anyone asks, Why we’re getting rid of the ribbon? or What’s wrong with ribbon pointing? Show them the above picture that illustrates how pointing with Ordinary Portland Cement accelerates the deterioration of the surrounding stone. It also looks a bit naff.
February 26th, 2013 | Posted in I do DIY stuff, I do PROPERTY stuff, Stuff from the Other Half (Wife), Whitby Cottage | No Comments
By Wendy the Other Half
In for a penny…
As you’ll have seen, the scaffolding is up. The chimneys are straight and the back half of the roof is on.
Now scaffolding has been a little bit of a problem (it’s also quite expensive) so whilst it’s up we’d best make the most of it. We wanted the cement render on the rear of the property to be removed at some time in the future as it does old properties no good. It’s also an unattractive pink colour!
We decided however that we would remove the cement render on the inside walls so the masonry was able to breath and we’d patch up and repaint the outside and revisit the outside render at our (Stuff Doer’s) leisure. Our builders asked what we were proposing to do about it and we’ve had a rethink.
With scaffolding being expensive and our need to effect repairs where the boiler and soil pipe will be moved we decided we’ll have it done now. Until it comes off we don’t know if it will need to be rendered again (in lime this time). We’re hopeful that the cement hasn’t done too much damage to the stone and brick beneath and that it will just need re-pointing. Either way, exciting times as we’re hoping the cottage has more of it’s history to impart. We’ll be able to see any changes to window configurations etc. so we’ll keep you posted.
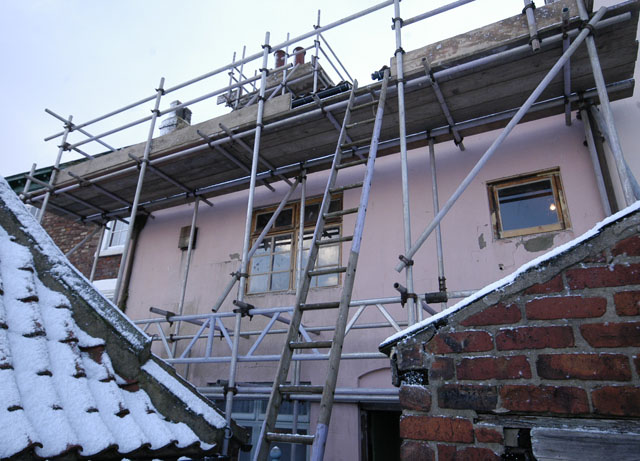
The Scaffolding is there so we might as well make good use of it
February 25th, 2013 | Posted in I do PROPERTY stuff, Stuff from the Other Half (Wife), Whitby Cottage | No Comments
By Andy the stuff doer
The full flue liner article starts here and the video is on this page
Please leave comments or questions below.
Note: I’m currently looking in to, what problems might be caused by not sealing the top of the liner to the plate. So keep checking back, leave a comment below (wordpress should be able to email you when I’ve added to this post) or join us on facebook for updates.

- Chimney pots all straight now
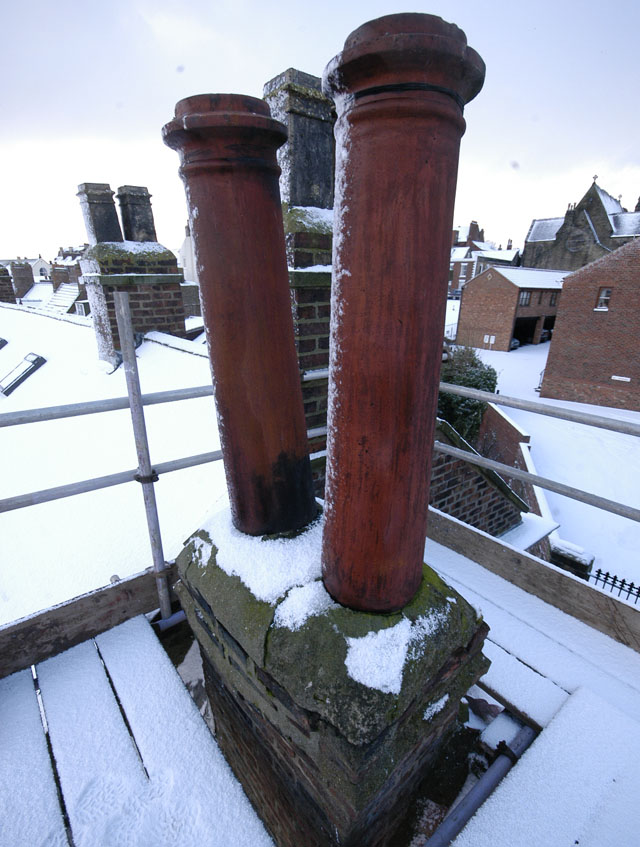 You’ll see from the previous Chimney Jenga Post that our chimney stacks have shifted a little. This occurred quite a while ago, probably pre Victoria if the construction of the wall built to hide it is a guide. Now the scaffolding is up Stuff Doer has discovered a rather cheeky effect on the chimney pots that we had been unaware of. The five foot high pots have been giving the “Vs” to Whitby for years. You’ll be pleased to hear our cottage is now more respectful of it’s surroundings since the builders have been up and installed the liners and re-sited the pots. How the Stuff Doer got those photos is beyond me. He’s not allowed on the roof!!!
February 12th, 2013 | Posted in I do DIY stuff, I do PROPERTY stuff, Whitby Cottage | 27 Comments
By Andy the stuff doer
Our walls in the Whitby cottage are around 2 foot thick, constructed of sandstone bound with mud (clay, earth and chopped vegetation). On the outside they have been ribon pointed with cement mortar which will, eventually, be chased out and replaced with more appropriate lime mortar.
Internally from what we can see, they were pointed with lime mortar. Although there’s not much evidence left on the inside as most disappeared along with the cement render we had to chip off. There is evidence that the inside of the cottage was lime washed directly on the stone although some had, at a later period been lime plastered.
We are planning to compact the mud as far as possible then repoint with lime. The majority of the stone walls will be left exposed, some will be limewashed and most of the brick walls will be traditional lime plaster to enable the walls to breath, at least one way, until the cement render on the rear of the property is replaced with traditional lime render.

Mud / Earth Mortar in some parts flush with face of the stone
A closer look showing how the mud /Earth would need to be raked out? or compacted back?

Close up showing some overpointing with lime plaster / mortar
So is compacting the mud back and repointing with lime the way to go? It’s the only option the I can come up with as there’s scant information around on this type of construction. Any comments or suggestions gratefully received down at bottom of this page. In the mean time I’ll ask the question on the Period Property UK forum (where many “lime experts” can be found)
Just to put this wall in context, this is the kitchen wall after removing the OPC cement render:

Mud mortar stone wall revealed in the kitchen
January 29th, 2013 | Posted in I do DIY stuff, I do PROPERTY stuff, Whitby Cottage | 1 Comment
By Andy the stuff doer
We encountered a big problem with scaffolding that needed a small solution. The full saga is detailed on this post about our scaffolding license woes. We eventual convinced “the man” from the council to let us errect a skinny scaffold or 2 board scaffold. It’s the only sensible way we could get the access and saftey required to re-roof our cottage on this very narrow street.
The article on the website explains more about it in some detail. SEE THE FULL SKINNY SCAFFOLD ARTICLE.
We’re unsure as to when the roof will be done as, apparently, pantiles are very brittle at freezing temperatures and lime mortar will have trouble setting too.
But we’re on the way which can only be a good thing!
The one downside is that the Stuff Doer has been to the cottage on his own since the scaffolding has been erected so promptly climbed up it to take some photos! I would go with him to keep an eye on him but it’s not practical as he likes to go up for three nights so someone has to hold the fort at home.
Also there is no flushing toilet!!!!
If you have any comments about the Skinny Scaffold otherwise called a two 2 board scaffold please leave a response down below the photo.

- Narrow scaffolding skinny 2 board scaffold
Read the SKINNY SCAFFOLD article.
January 26th, 2013 | Posted in I do PROPERTY stuff, Stuff from the Other Half (Wife), Whitby Cottage | No Comments
By Andy the stuff doer
See the “ONE Year On” progress report video here.
We’ve had lots of interest in our little cottage project, both on here and people physically walking past the cottage and being given a tour. So, one year on , here’s an update on our progress so far.
We’re hopeful to have a further video of the finished project in the not too distant future, how’s that for wishful thinking. In the meantime “like” us on Facebook for progress updates. And as ever we welcome your comments, questions and suggestions, just add them below.

- View the full Progress Report Video on the main website
January 26th, 2013 | Posted in I do PROPERTY stuff, Stuff from the Other Half (Wife), Whitby Cottage | 3 Comments
By Andy the stuff doer
That’s one big job for the Whitby Cottage restoration done. The new timber beam and column to support the bathroom is now installed.
As usual I didn’t go for the easy option. I felled the tree, hand hewed it to a beam and a column, and now it’s fitted ready for me to start rebuilding the floors above.
The full details are on the website. Hand Hewing and Retrofitting Beam and Column.
Any Comments, Questions or suggestions? Please feel free to type away below.

Beam and column fitted
December 4th, 2012 | Posted in I do DIY stuff, I do PROPERTY stuff, Whitby Cottage | 5 Comments
By Andy the stuff doer
The last room of the Whitby Cottage to get stripped back is the Kitchen. Being up there on my own means the kitchen is virtually redundant. As long as I’ve got running water somewhere, kettle and microwave, I’m OK. It was time for the last few discoveries.
Unlike an onion, the room gets bigger as I peel back the layers and journey back in time. This wall gives us a useful extra 3 inches.
If you have any suggestions for dates of the layers please let us know (comments below).

Layer after Layer added to the Kitchen wall
Layers in order:
Tiles, Paint, Plaster, Plaster board, Wall paper, Paint, Timber panelling, Wall paper, Asbestos, Fabric backed covering, lots of layers of lime wash, Lime plaster, More lime wash, brick.
I actually stopped when I got as far as the Lime wash. This process also revealed the full glory of our missing door.

The hidden door revealed
The door is rendered over from the outside and would have lead from the passage way. This is another detail to be added in as we try and piece together the house history.
December 3rd, 2012 | Posted in I do DIY stuff, I do PROPERTY stuff, Whitby Cottage | No Comments
By Andy the stuff doer
A bit of background: The Whitby Cottage renovation /restoration needs a new beam to support the bathroom floor, (read Whitby Cottage Floor in Need of Support), how it’s lasted as long as it has with a cast iron bath in up there I don’t know.
The plan to make new, additional beam with a column in the middle made sense. Approximately 8hrs. up in the woods and we had hand hewn a beam and column from a larch tree. (read the full Hand Hewing with froe, axe and adze story).
This left me with two large, heavy pieces of timber to transport out of the woods, down a soggy field and then 120 miles to Whitby.
The first part of this job was easy, leave them for three months to season, dry out a bit so they would be lighter to handle. For the next bit of the journey out of the woods and down the field I gave up trying to think of clever solutions and used muscle power instead. My son earned his dinner that day!
Last Week I had a Trike Trailer, this week it’s a bespoke beam trailer. It took a ladder, a step ladder some rope and many tie down straps. Looking rather precarious but actually very stable, the load was ready for the trip to the Whitby Cottage.

Trailer loaded with 5.3m timber beam plus the 50m of skirting board
The rain held off for journey but the high winds over the Yorkshire Moors where getting worrying. But safe and sound the complete load made it to within 30 metres of the cottage. The road is too narrow to park any closer. The whole lot had to be carried the last bit of the way, I wished my assistant was there to help. My Measurement where about right and I managed to manoeuvre the beam in to the passage way with out holding the traffic up for very long.

Beam for the Cottage parked up on Cliff Street Whitby
December 3rd, 2012 | Posted in I do DIY stuff, I do PROPERTY stuff, Whitby Cottage | No Comments