By Andy the stuff doer
I’ve not posted much on this (yet), its one of those “hobby” iDoStuff projects, something that’s just happening in my spare time. One one those projects with very little ~(only £20 pound 30$ ish / euro pressure)~ and of course an immeasureable amount of a sportsman’s bet. Is there any better motivation?
As of November 2012 its a runner! Ready to face all the officialdom, all the testing (MSVA) paper work (DVLA) so I get it registered, MOT’d and taxed. This has proved a bit of sticking point as I can’t do all this in the odd few hours in an evening. But I’m pushing it now and have made the first step to get a VIN number (required because it’s a new vehicle). This involved visiting the local DVLA office,filling out some forms that wern’t really fit for the job, then getting an appointment for another visit when the inspector was there.
A week later I made the second trip this time with the trike in tow, on the reconfigured trailer tent chassis. After a short wait the inspector called me out to have a look. A very sensible chap he was, not worrying about the engine number matching the donner bike v5, not asking to see recipts for all new /reused parts. He took notes on serial numbers he could see, took a few photos had a pleasant chat and told me the new VIN number would be in the post.

Trike on the trailer ready for the first trip to the DVLA
The rest of the write up and details will be on the iDoStuff site, when I’ve got minute, CX500 Trike build pages starts here, but in the mean time: Please leave any questions, comments or suggestions here. Cheers.
November 17th, 2012 | Posted in I do DIY stuff | 4 Comments
By Wendy the Other Half
Oh the joys of dealing with bureaucracy! Roofer booked, Scaffolder booked new roof in the beginning of October. So we were foolish enough to think until the Local Authority steps in. Our street is very narrow, the cottage is not very tall. The LA want a height clearance of five metres if the scaffold is to bridge the road, maybe the circus is coming to town and they need to get the giraffes up (that’s the only thing I can envisage that tall that’s skinny enough to get up our street). If we can’t get that five metres then we need to pay lots of money to put a height restriction on the road for the duration of the works, add to that the additional costs of notices in the local press and signage hire and we’re talking the best part of a thousand pounds on top of the, not unsubstantial, cost of the roof and scaffold in the first place.
Time for a plan B. We look at the LA guidelines and discover that if our scaffold leaves a road width of 2.75 metres then that is acceptable. (If the road is only used by “light vehicles”). Armed with this information and a tape measure we visit this weekend. Stuff Doer measures the road. A local also tells us that next door had the same sort of “skinny” arrangement that we were considering. So far so good, a skinny scaffold will fit leaving over 2.75 (2.86 to be precise) metres of clear road, now all we have to do is persuade our builder to work from one and pay him for any added labour costs.
Oh no, nothing so simple as that, the LA have moved their goalposts, or made them smaller. They now want us to leave three metres, so that HGV’s can still get up the street!!!! Never mind that no HGV would ever be able to turn into the street, or that the road is even narrower at a point further down the street.
We’re now in the process of trying to argue our point, but not being on the spot we’re unable to take precise measurements of the more narrow parts of the street. A job for next weekend then. Fingers crossed etc. that someone will be rational and take another look.
(update: We’ve been given a slight relaxation. If we can leave the road 100mm wider than the narrowest “pinch point” further down, we can have a licence. Apparently as there is no stated width restriction so any one can go up the street with any size vehicle and blame the council if they hit anything )
Will let you know how we get on.
October 25th, 2012 | Posted in Stuff from the Other Half (Wife), Whitby Cottage | No Comments
By Wendy the Other Half
(All the details for for the chimney rebuilding are here on the main iDoDtuff site)
The second of the top floor double bedrooms will be cosy. We are erecting a stud wall to form a passage to the master bedroom. It will easily fit a double bed but we want to make it as large and airy as possible. With this in mind I had managed to talk the Stuff Doer into removing a lath and plaster wall that had been built in front of the chimney stack, along with the two built in cupboards either side. Yes we were losing storage but it was much deeper than necessary.I visited after the Stuff Doer had been on one of his lone forays. “Yes” he confirms, the room looks so much bigger now. The only problem is that the lime plaster behind the old lath and plaster wall is a bit crumbly, too crumbly to repair. Ok, no probs, pull it off and re do. The Stuff Doer’s been itching to have a go at a full wall anyhow.
Oh dear! As we removed the plaster some rather curious gaps began to appear in the brick work. By gaps I mean fist sized holes that look like whole bricks are missing and a gap between the stack and the back wall you could slide your hand through! These gaps had been filled by the lime plaster. The chimney stack has actually twisted. Now I know this sounds scary but we know it’s not shifted since the wall in front was built, we can tell by the construction of the wall, hand riven thingies or some such which Stuff Doer will go into in more detail I’m sure.
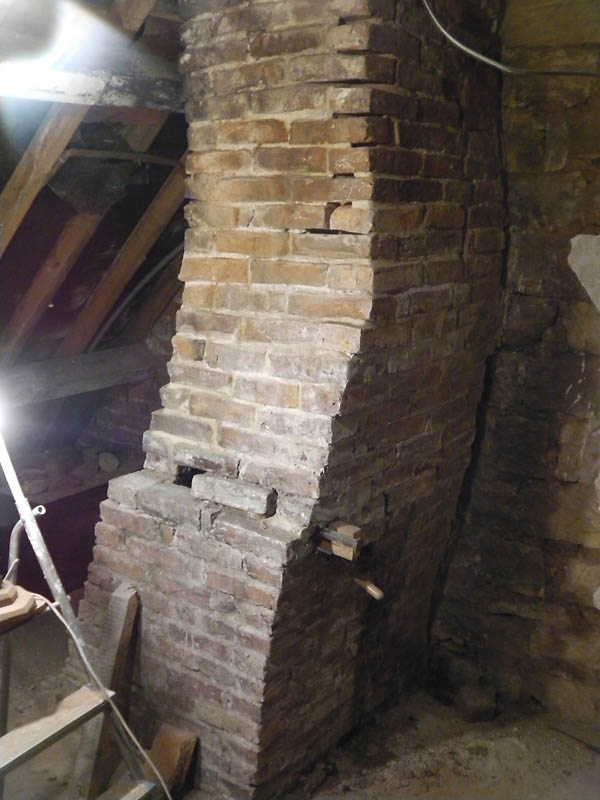
Chimney stack in need of repair
No, what’s scary is the Stuff Doer’s solution to make sure the stack is stable and moves no further. Hence Chimney Jenga, carefully removing one brick without disturbing its neighbours then reinstating it and pointing in, again without disturbing the other bricks. Using this method he can rebuild the chimney stack piece by piece.
On the bright side we now have an explaination for the “quiant” shape of the stack and by the time he’s done, it will be safe for Father Christmas to visit. Although whether the roof will be safe for the sleigh to land on by then remains to be seen!
Please scroll down to leave any comments, suggestions or responses, we do like hearing from you.
The full write up and “how to” for this chimney repair project including tips and tricks for repointing with NHL (lime mortar) are on the main site

Chimney stack repairs almost completed
October 25th, 2012 | Posted in I do DIY stuff, I do PROPERTY stuff, Stuff from the Other Half (Wife), Whitby Cottage | 6 Comments
By Wendy the Other Half
Back to the drawing board!!!!!
I have accepted defeat. Our bathroom cannot accommodate the bathroom I had envisaged when the Stuff Doer said we could fit in a seperate shower. In fairness, he had thought of a way to fit one in, we could even keep the old bath! On paper it looked great and we knew it would work as he’d been chewing it over with a professional (he’d had a photography job at Wetroom Innovations). It was a little unconventional but basically we would have a wetroom containing a bath with an unenclosed shower to the side, and the sink and toilet with exposed georgian floorboards in the other third of the room. Absolutely fine in theory. The problem started when the, rather practical, Stuff Doer brought home a brochure with waterproof walling solutions. I honestly tried to like them, in fact a lot of them would be lovely in most given situations. If I couldn’t live with that solution, it would have to be tiles. I really hadn’t envisaged my panelling and old walls being covered in ceramic. Lime plaster and limewash with the odd handmade tile round the sink and the beam the star of the show was what I saw in my mind’s eye (and much more in keeping with an old cottage too).
So, back to the drawing board. The initial problem, if you recall from previous posts, was that the rather lovely cast iron bath could not be, safely, stood up in. As it turns out it wasn’t safe to sit in either, it’s spent the last hundred years or so floating in mid air. And I’d had a bath in it, thankfully without much water in it. Imagine the consequences, there isn’t even an enclosed room beneath it! Anyhow, I still hankered after the potential bathroom I thought we would have when we had first clapped eyes on it.
After finally admitting this to the Stuff Doer he’s come up with…. Plan A, he’s going to make a duck board, tailor made for our bath, so we’ll have a safe showering platform. This enables us to keep the walls, bath etc. as we’d originally imagined. With the large fixed head shower and circular shower curtain. We’ll also have some kind of step stool to make it easier for elderly/ less able/ creaky kneed guests to get in and out.
In conclusion, I think if you want something a certain way explore all possibilities but, if they leave you dissapointed, admit it (even if you feel a little guilty about all your Stuff Doer’s thinking time). Any guilt will soon be assuaged when you persuade yourself and (more importantly) your Stuff Doer that the job is so much more simple now.
So, all he has to do now is insert a beam to hold up the floor, lay the pipes, relay the Georgian floorboards and fit the bathroom…. Simples!

The bathroom layout as we bough it. Bath Toilet and Sink, where will the shower fit?

When there is a floor, the free standing roll top bath with shower will be here

Both the Sink and toilet will be under the window after the wall has been lime plastered
September 14th, 2012 | Posted in I do PROPERTY stuff, Stuff from the Other Half (Wife), Whitby Cottage | 1 Comment
By Wendy the Other Half
We have recently returned from the first part of our summer “holiday”. Obviously, getting my priorities in order, the first outing with the youngest two was a visit to the local auction rooms (it was the last few hours of viewing before the sale!) Among the things of interest was a pair of books entitled “Images of Whitby” I had a quick look but they were limited editions so I thought they may be a little beyond my purse. Trying to be methodical, I look for all the lots I had highlighted in the catalogue but youngest child is pestering for me to come and look at a piece of furniture. Before I’ve looked at all the bits I was interested in I eventually relent and have a look. It was a rather spectacular gothic lump, exactly what we’d always envisaged in our Victorian dining room at home, but we’d never managed to find without a matching lumpy price tag. We return to the cottage and youngest drags Stuff Doer off to view the sideboard and I’m hopeful her enthusiasm is infectious. Thankfully, this worked and Stuff Doer returns with a shopping list of his own (he’d found a telescope). So just enough time for a trip to the beach before tea time and a bit of beam stripping before sale day.
I leave everyone snoring in their beds/mattresses and head off to Silver Street. My instincts about the affordability of the books proved correct, as they flew away at £700. A plastic pineapple ice bucket I had an eye on as a joke for a friend proceeded to sell for £32.!!! Things weren’t boding well, but I did manage to get the Stuff Doer’s telescope for a reasonable £18. I buy a couple of other interesting but inexpensive purchases and wait for the big one to arrive. I am successful so rush around the corner to tell everyone at home. The youngest is elated, Stuff Doer thinks I’ve paid too much, then I point out that it’s an auction, so you can only pay one bid more than everyone else thinks it’s worth and ,anyway, I was bidding against dealers. Mollified he accompanies us to pay for our purchases. I then realise I’ve managed to buy the biggest thing in the sale room!
Oh well, my Stuff Doer is nothing if not resourceful. He borrows a sack barrow from the obliging auctioneers (Richardson and Smith) and proceeds, a little percariously, down a steep ramp and then a rather steep hill to the cottage, with second youngest in tow (in case of incident) with the top half of the sideboard. I now have some serious doubts, without the top the sideboard looks much wider than it did. I wonder aloud if it will be too big for the space we have, the porter informs me that I wouldn’t believe how many times he’s heard that and it’s too late now. I reply that I’m not too worried as I’ve three reception rooms so I can make it fit somewhere. The delivery must have gone ok because Stuff Doer arrives back for the bottom half! He expresses similar doubts but trundles off with the, undoubtably much heavier, bottom half. Myself and children then take down the drawers, the telescope, a piece of jet and a small collection of dolls house furniture.
Now for the difficult bit, getting a Victorian side board of rather showy proportions into an old quaint and quirky cottage is never going to be easy but the Stuff Doer works out the angles and we somehow manage it. The top even fits on (if we position it just so between the beams) Thankfully our doubts about size are dispelled as, if it fits in the cottage dining room, it’ll definitely fit in it’s intended home even if it may cover the light switch! We’ll have to wait to find out as the sideboard is far too big to come home in the car when we’ve got the kids with us, so in Whitby it waits. Unless I can persuade the Stuff Doer to take his sack barrow with him when he goes on his own next. I can probably manage that as I’m certainly not messing around with varnish stripper on the beams when my new sideboard is sitting underneath them!

Now how to get this sideboard back out and home?
September 14th, 2012 | Posted in I do PROPERTY stuff, Stuff from the Other Half (Wife), Whitby Cottage | 4 Comments
By Wendy the Other Half
I really don’t know where all the time goes. The six week holidays have flown by in a whirling dervish of full family Whitby visits, kid’s birthday parties, kids’ flying visits to Congleton (thanks B&G) and Stuff Doer’s lone weekends at the cottage making it safe for us to visit. There have also been numerous trips to the woods tree felling and beam hewing. Phew, worn out just thinking about it.
Well, first trip after the Stuff Doer had made the house safe-ish. We arrive and Stuff Doer tells us to be really careful in the bathroom and, under no circumstances, should we step off the chipboard. Kids and myself pay a quick visit to the local auction rooms (more on that later). We call at the cottage to pick up the stuff needed for a quick visit to the beach. I nip up to the loo. I have forgotten just how considerate my Stuff Doer is. Whilst we were away he’s left us a reminder of how unsafe the bathroom floor is, a perfect size 9 foot shaped hole!
Our longed for duck egg linseed oil paint has arrived, hand mixed and exactly when they said it would. The colour is an exact match to the swatch I had sent them and we’ll let you know how we get on later.
Don’t feel too sorry for us though, we made sure the kids had a decent holiday. I may make three trips a day to the hardware shop (you try carrying six foot of beading across a narrow swing bridge packed with holiday makers and Morris dancers) but we made sure we had a few days off too. We had a walk to Sandsend, although we didn’t quite manage to outrun the storm on the way back. We were treated to a stunning Red Arrows display, along with a Sea King and a Spitfire. We also had fantastic fireworks, all courtesy of Whitby Regatta. It was Folk Week too (hence the Morris dancers) which made the one night out we had rather special.

Plenty to do and see during folk week and the regata
We bit the bullet and became members of English Heritage, hopefully saving us money in the long run (especially with the amount of trips daughter two makes up to the Abbey). We had two great family days out there, with all of us enjoying the jousting displays and especially the Dracula dramatisation.
The main aim now for the cottage is to make it water tight and get the heating sorted (which entails putting in the new beam so the pipes can go under the bathroom floor) before the North Yorkshire winter finally closes in.
Here’s hoping for a good long Indian Summer!
September 14th, 2012 | Posted in I do PROPERTY stuff, Stuff from the Other Half (Wife), Whitby Cottage | No Comments
By Andy the stuff doer
Well project this pulled in a few of my passions, Hand Crafting, the renovation and the Woods. We need a new beam to go in the Cottage to support a failing floor. It needed to be in keeping with the existing hand hewn beams, I really like trying out old time, traditional craft skill and with trees ready to fell the materials where on hand.
So after a few hours in the woods, I produced exactly what we needed and apart from buying the adze and small amount of fuel, it’s cost nothing. A great example of the time and money equation with DIY – Find the time to do it yourself and your don’t need to spend the money.

Childs play, well would you like to say youve tried it?
If you’ve not seen it already the full Video and more details are on the iDoStuff website.
If you have any thoughts about the way I’ve hewn this beam, comments, suggestions or questions, please leave a comment below. And if you want to see how it ends up when installed keep in touch via the face book page , just Like the page and I’ll post when it’s done.
August 31st, 2012 | Posted in I do DIY stuff, Whitby Cottage | 4 Comments
By Andy the stuff doer
Just a quick post for somwhere to put comments. The main Planer Thicknesser article is here . The model covered is a Woodstar PT85 which seems to be very similar to other makes. The videos have received knocking on for 70,000 views on Youtube and there are plenty of folks who have them useful.
It’s few years on from my original review and my woodstar is still working OK so the conclusion ” OK for the money” could now be upgraded to ” Good for the Money”
Anyway I’ve just had a comment through direct to my email that I’ve reposted down in the comments. If you have any experiance you would like to add please feel free.
Cheers
August 15th, 2012 | Posted in I do DIY stuff | 13 Comments
By Andy the stuff doer
This is just a quick update as I’ve not mentioned the woods for a while. Well the trees keep growing without me. The little time I do get to spend in there, after just looking around and enjoying it, has been spent making a start on a shed. I really could do with somewhere to store my tools and the tractor. So the plan is to make a strong shed without importing anymore than the bare minimum of materials. This is a fun project, I’ve not really planned it and there’s no pressing timescale. One technique I did however want to master was milling my own timber. Being me I’ve also been developing my own design of milling attachment for the chainsaw.
I’ve milled enough boards now from two seriously leaning larch that where ready for felling. Starting from scratch with the milling process has taught me a lot and hasn’t been without problems. The attachment has worked well but needs a few modifications. If it’s good enough it might get in to production at a later stage. I think I’ve about got the ripping chain angles and sharpening sorted, although I think I might be ready for a new bar on the chainsaw.
The main thing I’ve learnt is the secondhand chainsaw bough wasn’t up to par. About halfway through it gave up the ghost after getting gradually harder to start and loosing power. Investigations back in the garage revealed a worn piston that eventually part seized. So I know how to replace a piston in a stihl 036 and I’ll post the how too when I’ve got the chance. With that fixed I was sawing the boards twice as fast as before.
The boards shown here are stacked on top of my log sawing station. ( I’ll have to cover that at some point as well).

milled boards stacked on the log cutting station
The basics of the shed are round wood uprights with Larch board sides. Ive also incorporated the base of Larch as one of the corners.

Uprights, door frame sorted and a start on one wall
The boards I’m fitting with a 45 degree (ish) angle on the edges to shed water out. All cut to fit where they touch. You can also see in the picture how they fit in a groove in the larch base.

The first two larch wall boards in place
How the rest of it and roof develops , Im not quite sure yet, we’ll have to wait and see. One thing I am certain of is that it’ll be rustic looking and quite original.
July 23rd, 2012 | Posted in I do DIY stuff, I do Woodland Stuff | No Comments
By Andy the stuff doer
Another weekend at Whitby and I’ve peeled back some more layers to reveal more of cottage’s past. First on the list was re-bodging the plumbing in the bathroom so it will still function, toilet, sink and cold tap as we do need a minimum of on site welfare provision. These I can strip out again as and when I’m fixing the floor.
So now the floor is clear of pipework even if you do need to step over the pipes in front of the door. With this shifted I could carefully lift the next layer of floor consisting of 12″ wide boards, these are now stacked ready for re-use.
Floor under floor under floor
What’s left of the original floor after the woodworm has had their fill is now visible and only accessible with great caution and a something to spread my weight. Some old bits of chipboard are now down so we can get to the toilet and sink.
Next on the list was to remove cracked 1 1/2″ cement render from the window wall in the bathroom. And away came the loose bricks with it. So I jacked the lintel up over the window and started working back to solid brick work. I didn’t find any so stopped before I ran out of wall completely. The benefit of this is, we can now see all of the spur coming of the cruck frame that goes in to the wall. I can also feel around the base of cruck all of which I’m sure the YVBSG will be extremely interested in when they come next week.

The spur from the cruck frame going in to the outer wall
Whilst I still had some energy left I cleared out the second fireplace. Giving me plenty more rubble to fill the space left after a couple of earlier dump runs. Now I can see what needs doing to it, luckily no where near as much as the downstairs fireplace need. We intend having a small stove in there but as yet we have no idea about the fire surround – Any suggestions welcome –

Fireplace two with all the rubble and fire back removed
Then I took out some stud work at the side of top flight of stairs and did some much needed tidying up. It’s ready now for the first few days of our “summer holidays”. Although I’ll only be going down to the beach for a wash.
July 23rd, 2012 | Posted in I do DIY stuff, I do PRO stuff, I do PROPERTY stuff | 2 Comments