
Whitby Chimney Jenga
By Wendy the Other Half
(All the details for for the chimney rebuilding are here on the main iDoDtuff site)
The second of the top floor double bedrooms will be cosy. We are erecting a stud wall to form a passage to the master bedroom. It will easily fit a double bed but we want to make it as large and airy as possible. With this in mind I had managed to talk the Stuff Doer into removing a lath and plaster wall that had been built in front of the chimney stack, along with the two built in cupboards either side. Yes we were losing storage but it was much deeper than necessary.I visited after the Stuff Doer had been on one of his lone forays. “Yes” he confirms, the room looks so much bigger now. The only problem is that the lime plaster behind the old lath and plaster wall is a bit crumbly, too crumbly to repair. Ok, no probs, pull it off and re do. The Stuff Doer’s been itching to have a go at a full wall anyhow.
Oh dear! As we removed the plaster some rather curious gaps began to appear in the brick work. By gaps I mean fist sized holes that look like whole bricks are missing and a gap between the stack and the back wall you could slide your hand through! These gaps had been filled by the lime plaster. The chimney stack has actually twisted. Now I know this sounds scary but we know it’s not shifted since the wall in front was built, we can tell by the construction of the wall, hand riven thingies or some such which Stuff Doer will go into in more detail I’m sure.
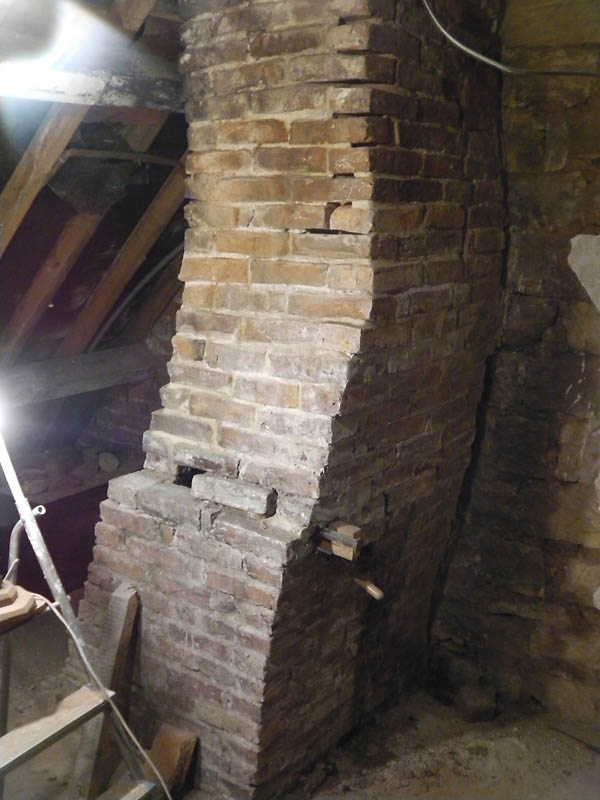
Chimney stack in need of repair
No, what’s scary is the Stuff Doer’s solution to make sure the stack is stable and moves no further. Hence Chimney Jenga, carefully removing one brick without disturbing its neighbours then reinstating it and pointing in, again without disturbing the other bricks. Using this method he can rebuild the chimney stack piece by piece.
On the bright side we now have an explaination for the “quiant” shape of the stack and by the time he’s done, it will be safe for Father Christmas to visit. Although whether the roof will be safe for the sleigh to land on by then remains to be seen!
Please scroll down to leave any comments, suggestions or responses, we do like hearing from you.
The full write up and “how to” for this chimney repair project including tips and tricks for repointing with NHL (lime mortar) are on the main site

Chimney stack repairs almost completed
HOW DO I KNOW IF I HAVE LIME SHARP SAND OR CEMENT SHARP SAND MIX?
I CAN SEND A PHOTO ATTACHMENT.
CAN YOU ALSO ADVISE WHAT RENDER TO USE?
Hi, A test for lime mortar or plaster is to take a sample and drop some vinegar on it. If it fizzes its lime. Cement is also grey in colour whilst lime is a lot lighter (although it may have been coloured so not conclusive).
Sorry I can’t advise on what render to use, it will all depend on the exact situation. I do know many good lime suppliers offer an advisory service. Check out their websites and give them a call.
Just for information I used NHL 3.5 (hydraulic lime) with a sharp sand and soft sand + hair on the back of the cottage.
Hope this helps
Been a bricklayer (mostly reclaimed stuff) for 30 years and I love the angled hawk you made from an old plastering trowel!
I use a bricklaying trowel and a ‘flick of the wrist’ to load up my own home made finger trowels (made from cut down cheap “Sunday market” pointing trowels) but I’ll definitely have a go at making something with a turn up now.
It’s a bit laborious I know but I run my sharp sand through 5mm mesh nailed to a frame. I find it gets me a perfect sand to use with lime. I guess it varies region to region too.
Nice job on the chimney, to nice to be hidden away up there lol!
Stay well
Hi Ian, Glad you liked the angled hawk, I find it very useful. The sharp sand I’ve been getting is fine enough but I’ve had few bags of soft that have been contaminated with some big stuff, an absolute pain when when I’ve been using it for a finish coat.
Cheers
Andy
Hi,
Good effort and a lot better than most. But…
The lime mortar doesn’t have enough lime in it. 1:3 for NHL.
It should be mixed dry first then the least amount of water is added and then mixed well for at least 10 mins then left for another 20mins at least, it’s normal to leave overnight at this point and remixed with a bit more water when you need it. You’re adding water to achieve workability when thats the best thing about lime, its workability. Its easier to clean too, you wouldn’t be able to do that with fresh cut stone it would stain it because its too wet. Semi-dry can be brushed off the top and doesn’t seep into the stone.
Too much water compromises the strength of the mix.
Leave until green and then beat back with a churn brush to achieve a closed finish with exposed aggregate. It should never be trowel finished as this restricts its breathability. Even ashlar mortar is brushed back and not trowelled. You’re emulsifying it like tile grout when you do that.
Use a mix of sharp and soft sand to get the closest match unless its Fine Ashlar in which case the sand will most likely be produced by the banksmen when cutting the stone. The bulk would have been a standard mix, probably hot lime and the top is a putty based mix made from sand from the stone a lot of the time.
Thanks for comment but you can’t leave NHL overnight as it has an element of Hydraulic set.