Downstairs floor investigations and inglenook hearth

By Andy the stuff doer

Another decision point, what to do with the floors downstairs.  It had already been decided to get rid of the existing floor tiles but there was one thing left before we went any further.  To find out if any old flagstones had been covered over.

In the kitchen I took up some tiles and chiselled a test hole through the concrete slab.

hole int concrete slab to investigate

Nothing but sand and gravel under the kitchen floor slab

So I didn’t find anything worth diging the slab up for, it could be stripped and re-tiled. I managed to save enough of the old tiles to reuse in the wash house. Re-Tiling was a fairly standard job although using large tiles isn’t very forgiving on an uneven floor. Contours can’t be followed as the edges end up being on different levels. Rarther than raising the floors even more leveling compound I took down the high spots and slight slope to the wall under the cooker using a angle grinder and chisel.

Result after the grouting is spot on.

Tiling on kitchen floor

Re-tiled kitchen floor

Also note the at the top of this picture the angle where a skirting had been. This indicates the floor had a serious slope to in the past.

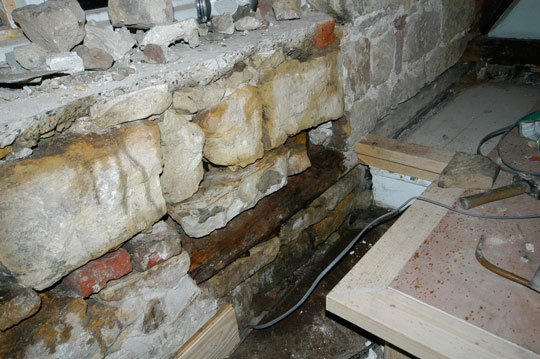
The Inglenook hearth had 6″ square vitreous tile that where trying to look like old quarry tiles. These came up without too much trouble. Under those was concrete that raised the hearth slightly above the rest of floor. When the concrete was coming up we first discovered some flags but as more came up and rubble stack got higher the true extent of condition was revealed.

old hearth revealed

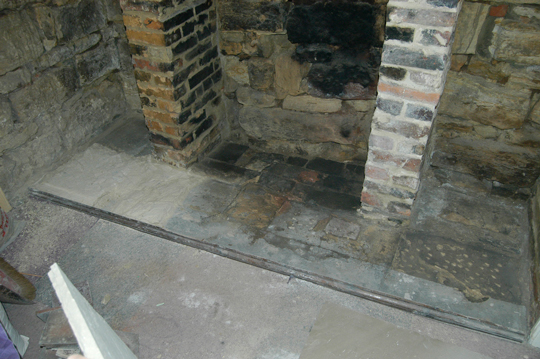
Damaged flagstones and brick revealed under the tiles and concrete

The slabs where cracked, soft and it looks like they where chiseled to give a texture before being concreted over. I also had a look further in to the room but that is all concrete as we suspected from previous test holes.

The decision here was to use new stone slabs. Re-cycled Yorkshire flags would have been very nice but expensive so going with the philosophy that “if its new it can look new” we found some great looking large slabs at our local builders merchants. I was quite surprised when I actually got the bill at end of the month to discover they where only around £20 per square meter.

flagstones in inglenook hearth

inglenook fireplace hearth with new flagstones

An angle grinder and some NHL mortar was all it took to fit them. They still need sealing then grouting in but thats another bit off floor sorted.

I also investigated the hallway to see if the levels could be brought down enough to use the same stone here. Yes I think it will be fine.

The rest of the floor in the downstairs room will be oak over a layer of insulation bring the floor level up the that of the kitchen, hearth and hallway. So now I know what I’m doing Iv’e just got to get round to doing it.

Another wall sorted

By Andy the stuff doer

The inside wall of the first floor bedroom adjoins the living room and the bathroom.  On the living room side we’ve stripped off various layers to get back to the timber panelling. The section to the bathroom was in an un-savable state so was removed completely. On the bedroom side of the remaining wall, removing a layer of hard board revealed the many layers of wallpaper and a thick backing paper. This was actual holding some sections of the panelling together as rot and woodworm over a few hundred years had taken it’s toll on the tongue and grooves.

Whilst restoring this completely would have been possible it would have left us with a very thin wall between the bedroom and living room.  The eventual solution was to stabilise and beef up the wall to give a little more accoustic privacy to the bedroom.

Peeling back and stripping off the paper revealed the worst affected parts of the panelling.

rotten and loose timber panel wall revealed

rotten and loose timber panel wall revealed

The next step was to fix battens across the wall, shimming where necessary to give a flat face.  Using 1″ x 1 1/2″ timber minimised the wall thickness whilst giving enough room to fit electrical back boxes, wiring and some insulation.

wall part construction

Battens insulation and wiring for the television

On the most unstable areas additional battens were used to hold the old timber panels together. All carefully spaced to support the plaster board joints.

Battens for plaster board

Old panels stabilised and ready for boarding

With the skirting fitted and all the joints skrim taped I used my much refreshed plastering skills to finish off the wall.  So we now have another  wall sorted.

skim coat on plaster board wall

Bedroom wall plaster boarded and skimmed

This room is looking close to being finished especial now I’ve also repaired the ceiling but it’ll still need many hours before it’s ready for final decoration.


Built in bed sorts uneven floor

By Andy the stuff doer

The floor of this bedroom is very uneven, movement in the past and bowing of the supporting beams had caused part of the floor to slope down. The other part of the floor had support from the passageway wall underneath. I could have lifted the existing floor and packed out the beams. This would have meant disturbing the old floor boards and raising the floor level so there would have to be step in to the room.  It took some lateral thinking to come up with the solution of a fixed, built in bed base.

This covers most of the problem area and has a number of added benefits.  A normal bed base would have to be cut down anyway to go over a raised section in the corner that allows for head room over the step at the end of the passage.  With a built in bed base I can fit more thermal and sound insulation over the passage. It gives plenty of room to fit the ventilation duct to the kitchen.  I can set back the base legs and sides to give more foot room at the side of the bed.   The only potential downside is that it defines the room as a bed room, but that isn’t not a concern for us.

The base is a solid timber construction that will have drawers fitted in the end.

Built in bed base

Built in bed base solves uneven floor problem

By also making a built in bed side cabinet I can cover the ventilation duct manifold (more about how that’s made later)

ducting manifold

Ventilation duct manifold to be hidden in bedside cabinet

The insulation is a sandwich of rockwool-vermiculite-rockwool. The first layer is a thin layer of rockwool type insulation this will stop the vermiculite falling out if the old lathe and plaster work is damaged.

Rockwool layer of insulation

Rockwool layer of insulation over passageway

The middle layer is about 100mm of vermiculite. This is suposed to have much better sound proofing qualities than rockwool but it is still lightweight. Another thin layer of rockwool over the top fills any remaining space before the 18mm chipboard is screwed on top.

Vermiculite for improved sound insulation

Vermiculite for improved sound insulation

All in all it seems to be a perfect solution although there’s still plenty to do to finish it off.

DIY Built in double bed frame

Built in double bed frame

Exposed Stone in bedroom 1

By Andy the stuff doer

Compared to the attic rooms, the first floor bedroom started of  as looking a little under par. Yes it had the only exposed part of the cruck frame and a beamed ceiling  but it was just a rectangular box. It needed a little more character.  We found some as we stripped back to the timber wall next to door and even more after I chipped away all the cement based render from the thick stone outer wall.

It revealed quite a bit about the changes  over time so it was decided to leave the stone work and timbers exposed.  As with most decisions on this project it added another considerable chunk of time, but never mind it’ll be worth it in the end.

stone bedroom wall revealed

stone bedroom wall revealed

In this photo you can see the majority of the stone wall. On the left of the window I had already re-pointed to fit the radiator, so the boiler could be fitted, so I’d at least be warm working through the depths of winter this year.  On the right the remnants of lime putty plaster can be seen in the joints.  The window is now obviously smaller than the previous one but the opening has been widened on the left even though its been built back in on the right.  The top of the opening now has a concrete lintel with some brick bits to the underside of the outer timber lintel.

I chose to re-point using hydraulic lime rather than lime putty because the finish would be close in colour to the stone so the various joint widths and large areas would not be dominant.  The surface would also be less prone to damage and dusting than lime putty, important as the the wall will be brushed against at the side of the bed.   As many of the joints where deep and wide I took a two stage approach.

When all the cement render was chipped off some areas where in very poor condition. This area is prepared ready for re-pointing.

prep for repointing stone

Cement render removed and joint prepared for repointing

These wide and deep areas were first filled with a mix of sharp sand and NHL 3.5  ( mix ratio 3:1)

dobbing out joints

Wide and deep joints filled with sharp sand and lime

The top layer is yellow soft sand and NHL 3.5 (2.5:1).  This is carefully shaped to the profile I wanted, slightly back from the stone face but without leaving  prominant ledges that would be difficult to clean.  After a couple of hours it is worked back to close up any shrinkage cracks. After it has started to set the surface is rubbed to remove tool marks and apply an even, sandy texture.

finished stone pointing

Surface pointing with yellow / soft sand and lime

Tidying up the window surround

The picture at the top of this post shows how rough the window surround is.  It had been plaster boarded over to make a window opening the same size as the current window.  The room feels much bigger without the boarding so I came up with another plan that would also add a bit of insulation.   I boarded the area as close to structure as I could with the insulated tile backing board I used on the Dormer upstairs. 

window reveal boarded

Insulated tile backing board as backing for render

This provided a stable backing I could then render with the same mix I used for pointing the stonework.

mesh for render

Mesh to reinforce rendered corners

Corners reinforced and curved with mesh instead of a round bead that I used upstairs

rounded render corners

Finished render with rounded corners

Rendered and finished with some crafty float work and rubbed to match the pointing. It all blends in together and the room is beginning to look a bit special.

More loft room plaster boarding and plastering

By Andy the stuff doer

I had previously managed to plaster board most of the attic walls and ceilings but it needed a few more sheets to finish the rooms so I could plaster it all.  I didn’t show the new wall in the previous post so to start with is the new stud wall separating the  twin room from the landing area.  Previously you had to walk through one room to get to the other. With much head scratching we eventually worked out how to fit in two single beds and have floor space to make the room cosy but comfortable. Pinching inches wherever we could meant the studs where only two inches deep making the wall 3 inches in total with the plaster board.

sound insulation fitted in thin attic stud wall

sound insulation fitted in thin attic stud wall

To give the stud wall a bit more sound insulation the cavity is filled with rockwool, seen here held in place with some tape before the plaster board is fitted. Then on to the landing area you should just be able to see here the round dowel or brush handle at the corner of the dormer window.  This is to form a rounded corner. As it’s quite low, rounded corners make it a bit softer on any heads that might come in to contact with it.  It also matches the corners on the remaining lime plaster work at the side of the staircase.

Landing area plaster board with round timber bead to form rounded corner

Landing area plaster board with round timber bead to form rounded corner

Following the plaster boarding is to the skrim tape all the joints between the boards, all the corners and where they fit to the existing walls.  Unfortunately it looks like I’ve lost a set of photos so I’ll skip to some photos of the finished plastering. First some easy bits, flat sections between purlins gave me chance to hone my plastering skills, I was a bit rusty.  Then on to the horizontal ceiling parts and finally to the tricky rounded corners and details.

Finish plaster on plasterboard in attic room

Attic rooms plastered

The corners to the dormer ended up looking great once I had worked out how to trowel an even curve.

Plastering a rounded corner

Plastering a rounded corner

And some more details around the window where adding the insulation made it an awkward area.

Plastering detail

Plaster detail around purlin and insulation keeping the corners “soft”

Prior to Plastering I had fitted the skirting boards (which reminds me I’ve not shown how I mould these with the angled quirk) and the recycled architrave around the doors. Here’s a little detail on the skirting board that gives a little extra space at the head of the stairs, it looks a bit fancy as well.

Curved skirting board corner

Curved skirting board corner made up from small sections

It’ll just need a bit of filling and sanding to make a neat looking smooth rounded corner. With all that done the two attic rooms and landing are well on the way to being finished. Although the final details will take up many hours.

Loft – Attic eaves cupboard

By Andy the stuff doer

The previous posts show the insulation that went behind the other dwarf walls in the attic. These contained plumbing and ventilation ducts so the space was unusable.  There is one wall in the attic that did have some useful space available.

The cottage now has a fully insulated roof so just putting a door in to the space behind the wall wouldn’t be a good idea.  For a start it would be a gap in the insulation and it would be a magnet for condensation build up.  The cupboard space had to be fully insulated and vapour proof.

Attic cupboard Insulation

Insulation and vapour barrier to attic eaves cupboard

It took lots of fiddly work with the kingspan / celotex / balytherm to ensure  neither the insulation or vapour barrier where breached.  Behind the green polythene barrier is rock wool type insulation.  All the joints are either taped or sealed with silicone. Where wires come through the electrical back boxes will be sealed when the sockets are finally fitted.

The Inside of the cupboard then had a layer of plaster board screwed on and I even gave it a coat of paint before I clad the wall.  At this stage I had run out of old panelling to re-cycle so I had some new stuff aclimatising  to reduce contraction before it went on.

Attic dwarf wall clad in timber

Attic dwarf wall clad in timber

The door was originally on a cupboard in the inglenook downstairs and even there it was recycled from somewhere else. So its now in it’s third reincarnation, it’s worth keeping hold of these bits and bobs as you never know where they might fit.

Whitby Cottage update – January 2014

By Andy the stuff doer

Well how useless am I at keeping the blog up to date?  I’ve been taking the photos and have a massive backlog to catch up on.  In my defence I’m a bit short on time.  I’m cramming by day job in to 4 days a week so I can spend three days on the cottage.  The other half is working full time now as well so that input has had to be dropped.

So that’s my excuse

I’ve just looked through all the photos since the last update and come up up with a plan. So here’s a sort of index for the next few pages.

Loft eaves cupboard

Loft plaster boarding and plastering details + Skirting board rounded corner

Bedroom plaster board to timber panel wall

Bedroom stone wall re-pointing and window reveal

Bedroom – Built in bed

Downstairs floor investigations and inglenook hearth

Kitchen – corner repair

Kitchen sink shifting to get extra space

Kitchen timber panelling

Kitchen Tiling Floor and Wall plus the taps

Bathroom Floor

Bathroom Back (sound insulating) wall

Bathroom under beam wall

Heating- plumbers etc.

Ventilation system

So with that list you can see I’ve not been sitting around twiddling my thumbs, although I do have to spend a fair bit of thinking time.

The main priorities now are getting the kitchen and bathroom back to a usable state.  We’ve been spending in the sales and bought a massive fridge freezer and 900mm cooker. I’ve spent one evening seeing how to take them apart to fit through the 585mm wide door, just another problem to deal with in an old house.

These write ups may be a bit sketchy. If you want any more detail of the various jobs please leave a comment and I’ll try to answer.


Fighting West Bromwich Mortgage rate hike

By Andy the stuff doer

A little aside from the regular topics that I cover but this is part of campaign being organised to fight back against the Banks.  We all know the banks will try anything to squeeze more out of their customers but we can always shop around and the get the best deal..

That’s what I did to find a mortgage, it was sold to me (and 6700 others) as a Tracker, one that tracks the Bank of England Base Rate plus a percentage margin.  They where very keen to sell this to me thinking they would make a good profit on the deal.  But now, they have decided they need to make more money so they have changed the the tracker rate margin.

The main page on the iDoStuff shows what I thought I had and how they think they have a right to change it.

It seems they think they can away with this because it is a Buy to Let mortgage.  Yes, that makes me a Landlord but please don’t start moaning that Landlords deserve to burn in hell. Most of us (the ones you don’t get to hear about) are providing good quality housing with tenants that appreciate the service we provide.

I’ve posted the documents so you can ask yourselves, ” would I have signed up for this mortgage thinking it will track the BOE base rate?”

A group of Affected borrowers are getting together to fund a class action to challenge West Bromwich in court. If we don’t fight this and win, who knows whos mortgage will be next?

If you are affected please visit www.property118.  to join the fight.

Your comment are most welcome below.

Say No to the Misuse of Small Print on mortgage contracts.

Click to view the main page about the West Bromwich BTL tracker rate rise


Small Tractor for Woodland

By Andy the stuff doer

After two years of dragging trailers full of logs, the home made two wheeled tractor has been superseded.  It struggled with traction on wet grass and when it gets good grip the lashed together axle started bending.  After considering the cost and time involved with buying wheels and bearings and a different brake, I had a look at the alternatives.

I needed something low cost, small, high power and low speed.  The solution is a old ride on mower, with the mower bits removed it becomes what they call a “garden tractor”.  I found one on ebay, close enough to collect, at the right money (£260).

PMT (Poorly Maintained Tractor)

It hadn’t been well maintained but was still a runner.  A few evenings in the garage and it was all sorted.  New belt, oil, air filter, cleaned, greased, linkages tightened, battery charged and tow ball fitted.

Notes for my future reference (as I’m bound to lose my notes):

Engine Model: Briggs and Stratton 11hp  model 252707,  type 0686-01, code 84013011

Tyres: Rear 18 x 8.50, Front 15 x 6.00

Transmission Belt P No. 1688

Oil SAE30

That done it was ready for the first trip to the woods after I added an extra 2 inches of width to the trailer.

Small tractor "westfield" fit a 3 x 5 trailer just

The Westfield tractor just fits in a 3 x 5 foot trailer

A BIG GRIN as it had it had no problem pulling up the field with all the woods tools and the Son on-board.

It fits over the bridge but I’ll have to get used to chicane around the trees so the trailer wheels don’t catch.  I think edge bits on the bridge would add to the safety factor.

Mini Tractor and trailer crossing bridge in woodland

The "garden" woodland tractor towing the trailer manages to cross the entry bridge

With the trailer un-hitched it was time for drive around the woods. It copes well with ditches and hill climbs although traction is a problem on deep leaf litter so at some point it might get treated to chevron tyres.  Manoeuvrability is excellent due to the tight turning circle but on uneven terrain it ends up on three wheels and with only one front wheel on the ground it gets unpredictable.  The differential on the drive helps with the turning but won’t help with the traction, I’m thinking some kind of independent wheel braking might help when one wheel spins. Fifth Gear at top revs is scary fast on the narrow paths, as we’ve never had vehicle access there are no proper rides.  The low gears should be great for pulling logs, I shall find out on another visit.

It is great fun and will be worth it as a time, back and shoulder saver. The other advantage is, we noticed the tractor made very little impression on the ground,  an important factor as we don’t want to end up with rutted muddy tracks all over.

We brought two trailer loads of logs out without a problem and we made it home in time for Sunday dinner.

mini tractor mower for work in woodlands

Fun for all the family, the tractor ready for woodland work

Whitby Cottage Progress – August 2013

By Andy the stuff doer

We might have been a bit quite on the Blog over the last few months but that doesn’t mean there hasn’t been progress on the cottage.  I’ve spent most weekend s , starting on a Thursday night chipping away at the long list of things that need doing.  It’s been a long hard slog but I managed to get things in such a state that we have managed to get a few days holiday in during August.

This was an intermediate goal for me. The priorities for a Holidayable state were a toilet that could be flushed,  a bathroom sink with running water and at least one relatively dust free room for the daughters to sleep in, son doesn’t mind kipping in any conditions.

I made it just in time.  Although I did drop the 4th luxury of hot running water, the kettle had to work overtime.   The previous posts are some of the jobs that I managed to get done, plus a few more we got done whilst on holiday, in between trips to beach etc.

It was great to get the family up to spend some time there.  Not only to prove that this half time Dad has been busy doing something but to enjoy spending some time together.